Description
There are many types of destructive test to be performed on welds for WPS or WQTR qualifications. You have the guided bend, tensile, % elongation, Vicker’s hardness test, nick breaks, Charpy V-notch, etc. A welding inspector should be familiar with all of these.
Details
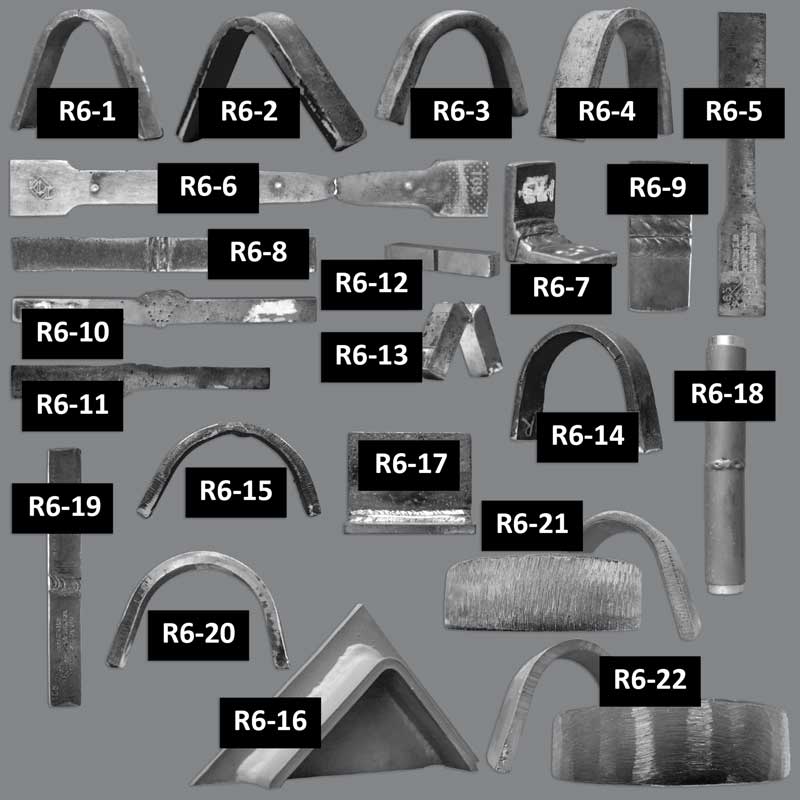
R6-1: ASME Face Guided Bend (1-1/2″ radius)
R6-2: ASME Root Guided Bend (1-1/2″ radius)
R6-3: ASME Side Guided Bend (1-1/2″ radius)
R6-4: AWS D1.1 Plate Face Bend
R6-5: ASME Sect. IX Reduced Section Tensile Test
R6-6: % Elongation Test – displayed with a tensile specimen that is broke with center punch marks
R6-7: API-1104 Branch (crotch) Nick Break
R6-8: API-1104 Nick Break
R6-9: API-1104 Branch (90° from crotch) Nick Break
R6-10: Vicker’s Hardness Test
R6-11: 6GR Specimen prior to machining for preparation or bending
R6-12: Charpy V-notch before breaking
R6-13: Charpy V-notch after breaking
R6-14: API-1104 Face Bend (2-5/16″ radius)
R6-15: API-1104 Root Bend (2-5/16″ radius)
R6-16: AWS D1.1 Box Tubing Specimen w/macro-etching on corners
R6-17: AWS D1.1 T-Joint Break Test with notch prior to breaking
R6-18: API-1104 ≤ 1.315″ pipe Tensile Test
R6-19: API-1104 Tensile Test 1″ wide X approx. 9″ long
R6-20: Pipeline Face Guided Bend (2-5/16″ radius) with incomplete fusion at toe of weld
R6-21: Pipeline Guided Bend (2-5/16″ radius) with grinding scratches parallel with axis of the weld
R6-22: Pipeline Guided Bend (2-5/16″ radius) with grinding scratches transverse to the axis of the weld


Reviews
There are no reviews yet.